Wednesday, June 1, 2022

Sailboat with Ribbon Streamers

Sailing Away With Gwen Studios!


When I saw this chipboard sailboat in my local Dollar Tree, I knew it would benefit from a "design upgrade." Gwen Studios™ Taffy Stripe ribbon was simply perfect for this project.

You'll find this ribbon at both Michaels.com and Walmart.com. #makeitwithmichaels


The project itself is so simple, and requires just a few supplies:

Gwen Studios™ Taffy Stripe Ribbon

Gwen Studios™ Taffy Stripe Ribbon

Sailboat Chipboard Wall Decor (I got mine at Dollar Tree)

Painted Wood Starfish (Also from Dollar Tree)

Scissors, Lo-Temp Glue Gun or Craft Glue

As I mentioned, this project is simple and quick to make! First I cut strips of both the Taffy Stripe Ribbon about 16" long (you can trim them later if you want them shorter). Next, glue them across the back of the chipboard sailboat.


Cut smaller ribbon strips to embellish the white area of the sail. Glue across sail, spacing evenly, then trim ends flush with the sail.


Glue a starfish cut out on the sailboat and three of the ribbons (refer to photo for placement).


I had a little ribbon and a wood starfish left over, so I trimmed a blue glass jar with them. I'm going to add a candle and use it and the Sailboat Streamer in my utility bathroom. The Sailboat would also look great as a door hanger.


I just love upscaling simple Dollar Store finds. But I also like adding ribbon to embellish clothing! Check back to see my next project - a child's ribbon embellished T-Shirt dress. It's a cutie!

Happy Crafting,

Jean

Many thanks to Designer Crafts Connection for the opportunity to post on the Linky Party. Be sure to visit and check the other projects from some talented designers!


Gwen Studios™ provided the ribbon for this project. You'll find their ribbons on Michaels.com and Walmart.com. Gwen posts wonderful projects on her blog, be sure to check in often.


Monday, March 14, 2022

Spring Egg Tree Featuring Gwen Studios Ribbons

 Spring Egg Tree

I'm so ready for Spring! This winter in Texas has been full of up and down weather swings, but finally I think I see Spring on the horizon.

I love making gifts, and Easter is no exception. I made this cute Spring floral tree for my sister. She loves Easter so much and I thought this would be the perfect accent to some pastel flowers and ribbons she has used on her other decorations.


The tree is easy to make, takes just a few minutes with a trusty "lo-temp" glue gun and some basic supplies. And of course, the finishing touch with beautiful Gwen Studios™ Grosgrain ribbon makes it just perfect.

Follow these simple instructions to make your own Spring floral tree.

Supplies Needed:

Gwen Studios™ 5/8" Yellow, Light Blue and Pink Grosgrain Ribbon

Gwen Sutdios™ Light Blue 1 1/2" Light Blue Grosgrain Ribbon

6" Foam Cone

Green Moss

Pink Silk Flowers

Greenery

Floral Wire

Lo-Temp Glue Gun

Assorted Foam Glitter Eggs (Large and Medium)

Tin or Ceramic Container

Toothpicks

Instructions:

1. Glue Green Moss around the foam cone. Insert toothpick into foam glitter egg, the insert other end of toothpick into foam cone. Space larger eggs at bottom of cone and smaller eggs toward top.

2. Glue greenery among eggs. Wire two loops of Pink ribbon at bottom, then glue among eggs. Tie Yellow and Blue ribbon bows, then glue among eggs and greenery.

3. Fill in any empty areas on the cone with Pink silk flowers. 


4. Nestle cone in a tin or ceramic container, hot glue to secure. If necessary, fill container with floral foam and glue cone to top of floral foam. My cone fit perfectly in the top of my floral tin.

5. Tie a bow of 1 1/2" Light Blue ribbon, then glue at top edge of container and bottom edge of cone.


I love the way this tree turned out! I'm planning on making more, but using teacups as the container. I'll tie some extra Gwen Studios™ ribbons on the handles. They'll make fun gifts for some special friends.

If you would like to see more projects for Easter using Gwen Studios™ ribbon, I have a project feature in the upcoming Spring Issue of Bella Crafts Magazine. The projects are a perfect compliment to this tree. I'll edit this article with a link when the issue publishes so you can download a FREE Issue of the magazine!

Some of my designing friends have done some lovely projects with Gwen Studios™ ribbon as well. Be sure to check out their projects on Designer Crafts Connection.

Until then, Happy Crafting and HAPPY SPRING!

Jean


Tuesday, December 7, 2021

Girl's Unicorn and Ribbon Purse


It's gift giving time and my grandaughter always likes something I make just for her. She has a fascination with unicorns, so when I saw this sequin unicorn patch by Gwen Studios™ in WalMart, I knew it would be perfect for her!

The bright, colorful 3/8" ribbons in the Gwen Studios grosgrain ribbon favor pack matched the colors in the unicorn, so I used these to make the fun ribbon loop trim.

This project is so simple to make, especially when you use a pre-sewn denim or canvas bag. Of course, you could always make your own with fabric you have on hand. It's just a simple square pouch with a front pocket and strap.

To make the purse as shown, you'll need these supplies:

Gwen Studios Sequin Unicorn Patch

Gwen Studios Polk Dot Ribbon Favor Pack

Liquid Stitch™ (or other fabric glue)

Scissors

Glass Head Pins

Pressing Cloth

Household Iron

Pre-Sewn Denim or Canvas Purse


Instructions:

1. Cut 4" long assorted colors of grosgrain ribbons from the favor pack. I used ribbon colors with polks dots similar to colors in the unicorn patch, you could alternate the solid grosgrain colors as well in your purse project.

2. Fold the ribbon in half and pin along the top edge of the purse as shown. Try to keep the bottom fold of the loops in a uniform line.

3. Pin the Unicorn patch in place at the center of purse.

4. If your purse has a pocket, pin a strip of grosgrain ribbon across the front of the pocket.


5. Fold back both of the cut edges of the ribbon and apply a drop of fabric glue. Repeat for the entire strip of ribbons. You could also tack the ribbon ends together with a drop of glue before pinning if you find that easier.


6. Remove pins one at a time, and glue the ribbon strip across the front of the pocket. Be sure to fold under the raw edges for a nice, finished look!

7. Let glue dry before proceeding to next step.


8. Using a pressing cloth, fuse the patch in place using a household iron and a pressing cloth following manufacturer's package instructions. Be sure to iron from the front, and the back side of the purse.


That's it, you are done! Wasn't that easy? As a side note, you could repeat this project on a T-Shirt, using the patch at the center of the shirt and the ribbon loops around the bottom hem of the shirt.

You could add the unicorn patch to the center of a hair bow, or use it to make ribbon sneaker ties...the possibilities for this patch and ribbon are endless!

I have some embroidered jeans I ordered for my grandaughter...I think I'm going to use more patches to decorate them, then she'll have the purse and jeans! I'll let you know how they turn out.

If you want to see more fun ideas and projects using these Gwen Studios patches and ribbons, visit Designer Crafts Connection. You'll see some quick & easy projects by some very creative designers.

Until next time...

Happy Crafting,

Jean


A huge thank you to Gwen Studios for providing the patch and ribbon used in this project. Thanks also to Designer Crafts Connection for publishing my design and those of other talented designers!


Tuesday, November 9, 2021

Bottle Gnome with Kunin Felt


 It's that time of year when I get the urge to craft for the Holidays, and Kunin Felt is a mainstay in my crafting supplies. I just love Kunin's bright holiday colored felt, so decided to make my project in those. You could also use one of the many other felt colors Kunin offers (so many choices...). In fact, I liked making this Bottle Gnome so much, I think I'll make another one with a Woodland Theme using "Forest" colors! Maybe I'll make two, I do love working with Kunin Felt - "no-sew" easy crafting, what could be more fun? 

I also had a small piece of the NEW Gwen Studios Die Cut Snowflake Silver Ribbon left over from some other Christmas projects I'm making for a NEW HOLIDAY CRAFT BOOK I'm doing for Bella Crafts Publishing and was delighted to see the snowflake ribbon piece fit nicely around the bottom edge of the gnome, adding a little sparkle. And of course, what would a holiday project be without a touch of "Peppermint" Taffy Stripe Ribbon (also from Gwen Studios)? I do love my ribbons, you'll find Gwen Studios Die Cut Ribbon in Walmart stores, and on walmart.com

Get your supplies together and let's make a Gnome!


Supplies Needed:

Kunin® Felt 9" x 12", Red

Kunin® Felt 9" x 12" Green

Kunin® Felt 9" x 12" White (If you don't want to use the Faux Fur)

Gwen Studios™Die Cut Ribbon, Silver Snowflake

Gwen Studios™Gwen Studios Red/White Taffy Stripe Ribbon 5/8"

White Faux Fur

Empty Plastic Bottle (mine was from the Walmart Flavored Water)

Three 3/4" Wood Doll Heads (half balls or wood balls will also work)

Pine Greenery (to make a little wreath, or a purchased mini wreath)

Hot Glue Gun

Scissors

Pinecones for Wreath, or a Pre-painted Sign Embellishment

Round Wood Slice (not shown in supply picture - for bottom of bottle, I found mine in Walmart in the crafts section)

3/4" Silver Jingle Bell


Ready to make your Bottle Gnome? You are going to love how easy it is!

Instructions:

1. Remove label from bottle, rinse out inside of bottle and let dry. When dry you are ready to cover the bottle with felt. NOTE: If you bottle Gnome is going outside, you'll want to weight it to keep it from blowing over. Rice, beans or kitty litter are good for this. Be sure to put the cap on the bottle after filling. My project is staying inside, or maybe going on a wreath, so I left mine empty.


2. Wrap the Red felt around the bottle so that there is about a 1" overhang of felt at the bottom of the bottle. Glue felt onto bottle. I didn't bother to trim the excess felt as it was only 1" on my bottle, however if you are using a smaller bottle, you will want to trim away excess. Don't worry if the felt doesn't cover the top part of the bottle, as the hat will cover that area.


3. Next, tuck and glue the felt toward the center of the bottle. Work small sections at a time so your hot glue doesn't cool before you press the felt to secure. When finished, your bottle bottom will look like this:


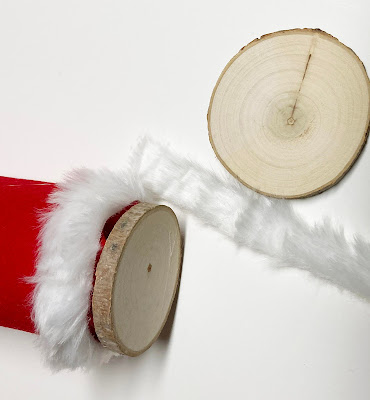
4. Now, lets cover the bottom of the bottle. You could use a cardboard circle covered with felt and glue onto the bottle bottom, but I found these wood slices and decided to use one. Since I choose not weight my bottle,  I am using a wood slice that I found in Walmart's craft section. It will give it some weight and a flat bottom. A tip about cutting the fur trim: You don't want to use scissors - it's best to work from the back of the fur and use a craft knife to score away just the lining of the fur. That way, you won't have a straight cut edge on the fur. If you do use scissors, use small sharp ones and slide the blades through the fur cutting from the back of the fur. It will preserve some of the fur "fringe" using this method. The width to cut fur is 3/4" to 1" and of course it needs to fit around the bottle. 


5. Glue the wood slice to the bottom of the bottle. Be generous with the hot glue here so the wood slice is firmly attached to the felt. Next, apply the fur trim to the felt around the bottle bottom - leave the wood circle uncovered, we'll add ribbon later.


6. Now it's time to add the beautiful Gwen Studios Die Cut Ribbon above the fur trim. You'll need to brush fur away from the felt with your hand. I applied a dot of glue at the center of each snowflake to apply the ribbon to the felt.

7. Time for a hat! Fold the felt in half widthwise as shown. Draw a line diagonally from the bottom straight edge (opposite from fold) of the felt up to the fold as shown. I used a sliver of soap to mark the line on my Green felt. Cut along the line, save excess triangle felt scraps for another project or embellishment! Open out the folded felt. Bring cut edges of felt together overlapping slightly to make a cone shape, then glue along the cut edge. Don't worry if your edges don't align exactly, they will be covered with fur trim.


8. Glue the hat onto the bottle. You may need to stretch the felt a little as you snug it over the bottle top. After the hat is on the bottle, lift edge up and spot glue in place. Leave area at sides unglued as the arms will be slipped under the hat there. Again, don't worry if the back bottom edge of hat doesn't align, it will be covered with fur. Or, if it's bothering you, trim it away!


9. Here is a picture from the front of the Gnome:


10. Make a beard from Faux Fur - remember to use your craft knife to cut from the back, or use scissors as outlined in Step 4. I also cut two smaller pieces of fur to use as a mustache. The photo below shows the front and back sides of the Gnome's beard.


11. Glue the beard at the bottom front edge of the hat.

12. Make two arms from Red felt. Cut 2 pieces of felt 3" x 4". Make a tube arm by folding 4" long edges to meet at center, overlap slightly, then glue. Repeat for other arm.


13. Tuck arms under hat at sides of Gnome's body, set over just a bit away from the beard. Refer to photo. Lift arm, then glue arm to body, then spot glue hat to arm.

14. Glue a 3/4" doll head into each arm sleeve for a hand. 

15. Glue a strip of fur around the edges of the hat. Positon remaining doll head (the nose) over the mustache and beneath the fur trim. When you are pleased with position, glue in place.


16. Add finishing touches: Glue the Red/White Taffy Stripe Ribbon around the wood base. Make a circle wreath from the greenery. Tuck the wreath in the arm, then glue in place. Glue a Red/White bow on the wreath and add a mini sign or pinecones. For a final touch glue a jingle bell to the tip of the hat.

Happy Gnome Crafting,

Jean

If you are looking for more fun felt designs, visit Kunin.

Gwen Studios ribbons and trims are found at Walmart stores.


See more great projects with Kunin Felt with other great Designers on Designer Craft Connection. Click


HERE to see the other designs!


Tuesday, November 2, 2021

Holiday Cards with Gwen Studios Die Cut Ribbon


I love making quick and easy cards and tags, and I'm always on the lookout for components that save time and add extra pizazz.

You can imagine how delighted I was, when Gwen Studios sent me samples of this adorable and intricate Christmas Die Cut Ribbon. I immediately saw how simple strips of this ribbon run vertically or horizontally on a greeting card would look fabulous!

I'm not one for all the time consuming fancy techniques some use to make their cards, but I DO like my projects to look great! Packing in some intricate detail with these Die Cut Ribbons was just perfect for my style.

Here is how I made the cards and the supplies I used:

Gwen Studios™ Gold Reindeer Die Cut Ribbon

Gwen Studios™ Silver Snowflake Die Cut Ribbon

Gwen Studios™ Silver "Falala" Die Cut Ribbon

Gwen Studios™ Red Lightbulb Die Cut Ribbon

Gwen Studios™ Gingerbread Die Cut Ribbon

Gwen Studios Christmas Ribbon Pack

Gwen Studios 7/8" Blue Satin Ribbon

Gwen Studios 7/8" White Satin Ribbon

4" x 6" White Notecards with Envelopes

Beacon® Zip Dry™ Adhesive

Your choice of Christmas Scrapbook Paper (I used: Candy Cane Stripe, Holiday Saying Squares, Blue Pearl, Red with Metallic Dot, Red and Green Cardstock)

Scissors and Paper Trimmer

Reindeer Card

1. Cut your choice of holiday paper to fit the front of the greeting card, or leave it plain White like I did with the Reindeer Card. 

2. Layer a square saying with Green Cardstock, then glue on the Reindeer Card. Glue a strip of Die Cut Reindeer Ribbon to the bottom 1/3 of the card. From the Christmas Ribbon Favor Pack  to add a glue strip of Green and Gold Snowflake Ribbon then Gold Metallic Ribbon under the Reindeer ribbon.

3. I added a Gold Metallic Ribbon bow to embellish the saying square. Card #1 done!

Gingerbread Card

1. Cut and glue peppermint stripe paper to the front of the card.

2. Cut and glue strip of coordinating Red paper across the card. Add a strip of White grossgrain ribbon (or White yardstick) onto the Red paper.

3. Glue the Gingerbread Die Cut Ribbon on top of the White strip.

4. Create a layered square embellishment using a Red cardstock square and gingerbread icon from scrapbook paper (or print one from clip art on your computer). Card #2 done!

Snowflake Card

1. Cut and glue Blue Pearl cardstock to the front of the card.

2. Cut 7/8" Blue Satin Ribbon, then glue across the bottom area of the card. Glue Snowflake Die cut Trim on top.

3. Cut Blue Satin Ribbon for the middle area of the card, notch both ends of the ribbon then glue in place.

4. Glue "Falala" Silver Die Cut Ribbon on top of the Blue Satin Ribbon.

5. Trim 3 Snowflakes from the Silver Snowflake Ribbon, then glue them across the card, centering between the upper and lower ribbon strips. Card #3 done!

Tis the Season Card

1. Cut Red Cardstock (mine had metallic dots) for the front of the card; glue in place.

2. Cut a Green Cardstock rectangle, 1/2" smaller on all sides than the card; glue in place.

3. Cut Green Holly Leaf Satin Ribbon and Red Holiday Lightbulb Die Cut Ribbon to go across lower area of the card (refer to photo for placement). Glue in place.

4. Layer a holiday saying square paper square with Red Cardstock. Glue in place on the card. Card #4 done!

Each of these cards took me less than 10 minutes to make! My kind of crafting!! I am sending these to a special friend to use for Christmas. She just moved away from her dear friends, and I know she'll love being able to send them a handcrafted card this Christmas. This is my "handcrafted gift from the heart" to her.

I hope you'll try your hand at these cards, or other projects you can make with the Die Cut Ribbon. It's available right now in your WalMart Store and on walmart.com. Here is a picture of what the display looks like:


Create your own "gift from the heart" this Holiday Season!

Thank you to Gwen Studios for providing me with the ribbons to make these projects!


And, thank you to Designer Craft Connection for inviting me to participate in this blog project!

Please be sure to visit these blogs to see the other Designers who also did projects with this fabulous Die Cut Ribbon! You'll enjoy seeing the variety of different projects and gift items. Just click on the Designer Crafts Connection logo or HERE.

Thursday, October 7, 2021

Spooky Ghost with Ribbon Streamers with Gwen Studios


Halloween Decorations don't have to be expensive, and here is a super simple project the kids will love making! No glue, no mess! My kind of project to do with the grandkids.

All you'll need is some of the fabulous Gwen Studios grosgrain and satin ribbon from walmart.com. This ribbon is sold in bulk rolls, so you'll have enough to make dozens of inexpensive Halloween projects from one roll! I'm making several of these ghosts to hang in trees, on the door and bushes outside. I love how the ribbon streamers catch the breeze!

Here is what you'll need to get started:


Gwen Studios 7/8" Yellow Satin Ribbon - 2 Yards

Gwen Studios 7/8" Orange Grosgrain Ribbon - 2 Yards

Gwen Studios 3/8" Black Satin or Grosgrain Ribbon - 8 Yards

Gwen Studios 7/8" White Grosgrain Ribbon - 1 Yard

Ghost Poly Chenille Form (I got mine at Dollar Tree but most stores have something similar)

Scissors

Step 1: Cut two 36" Yellow ribbon Streamers, two 36" Orange ribbon streamers, and one 36" White ribbon streamer. From the Black ribbon, cut eight 36" ribbon streamers. Trim ends diagonally on each steamer.


Step 2: Fold Black ribbon in half. Starting at the front of the figure, bring the fold through an opening at the edge of the chenille shape, then tuck the ribbon ends through the loop and snug ribbon against shape. I started my Black ribbon streamer at the middle of the ghost's arm.


Step 3: Repeat for the Yellow and Orange ribbons, placing one at each side of the Black streamer. Then place a Black streamer at the beginning and the end of the streamers.


Step 4: Repeat process for other side of arm.

Step 5: Loop and tie the White ribbon streamer at the bottom of the ghost. Place a Black ribbon streamer on each side of the White streamer.


Step 6: Tie a Black loop at the top to hang the Ghost.

That's it! Now one for the fence, the tree, the bush.....SPOOKY!

What's next from the same ribbon? Candy jars, Halloween Shirt, and a Tote...coming up next!

Wednesday, October 6, 2021

Wedding Elegance Rhinestone Candle with Gwen Studios

I was simply thrilled to get to make a project with this gorgeous ribbon. The Satin Ribbon coordinates beautifully with the Rhinestone and Satin Ribbon Trim! I just couldn't resist making a very quick candle that can be used not only for a Wedding Centerpiece but also in a home setting in a bath or bedroom. I just love the ribbon combined with the glitzy rhinestones. Sparkle and romance, yes!

And it couldn't be simpler to make! You'll need just a few supplies!

 
Supplies:

Gwen Studios Coral Satin and Rhinestone Trim

Gwen Studios Coral Satin Ribbon Tower

White Ceramic Candle Holder (I got mine at Dollar Tree)

Glass Candle Jar (I got mine at Dollar Tree)

White Candle to Fit Jar

Glue Gun and Glue

Optional - Green Floral Wire (Not Pictured)

Step 1: Cut ribbon for the bow. Mine is 16" from the 1" Ribbon, but you may want to use the larger or smaller width of ribbon depending on the size of your glass candle jar.

Step 2: Fold the ends of the ribbon to the middle, overlapping them as shown. Secure with a drop of hot glue.

Step 3: Use a piece of wire to gather the center of the bow. You can skip this step if you want to use the rhinestone ribbon to secure your bow, but I like to wire my bow around the candleholder.

Step 4: Glue the Satin Rhinestone Ribbon to a 4 Rhinestone width of the trim. I cut mine with scissors. You only need a small length, enough to go around the center of the bow.

Step 5: Glue the ribbon around the center of the bow, then wire the bow to the candle holder.

Step 6: Glue Rhinestone trim around the top edge of the candle holder.

Step 7: I wanted to cover the wire around the neck of the candle holder, so I glued the narrow ribbon around it to hide the wire.

Step 8: Cut Rhinestone ribbon and Satin Rhinestone Ribbon to go around the glass candle jar and glue in place. Put the candle in the jar, and set the jar on the candle holder.

And it's done! This project took me about 15 minutes to make, start to finish, so you can see how easy and inexpensive a project this would be to be part of a table centerpiece in a Wedding setting.

Make one of these yourself with the Gwen Studios ribbon, and see just how fun it is!

To see more of these fabulous products and others from Gwen Studios, visit walmart.com

To see more projects featuring the Gwen Studios Wedding Ribbon Assortment, visit these designer's blogs:

Nadine Carlier

Julie McGuffee

Sue Eldred

Michele Cummings

Teri Ricoli

Janet VonLone Trieschman

Rosie Nunjai